

Post by Admin on Jul 3, 2020 1:17:25 GMT
Fire is a tool which human beings have used since ancient times. Fire has been a destructive force that has helped to shape this planet in many ways even before the existence of humans. The destructive power of fire is believed to be one of the reasons for the extinction of the dinosaurs. Farmers today use fire to renew the soil in a technique known as slash-and-burn. The ability to control fire is a skill that has set human beings apart from other animals, but can still vexhumans and cause some amount of trouble when mishandled and/or mismanaged.
So, what can one do with a fire? “Army Ranger Rick” has this to say on the subject:
Also, fire can be used to make improvised weaponry, such as a spear, stronger by charring the sharp end in the fire. Fire can be transferred to a torch for a light and heat source that is portable. Fire can be a precious ally in the struggle for survival and therefore every serious survivor should know how to make one.
There are things that are needed for any fire:
In order to start a fire, one needs a good fuel source with lots of potential energy which will be released through burning, ample oxygen for the fire to consume, and an adequate amount of heat to get the fuel up to its ignition temperature. If these three conditions are met, then fire can exist. For a more complex and in-depth look at how the elements come together to make fire, please check the the "How Fire Works" article from How Stuff Works.
Generally, one will want to build a fire on dry ground with ample airflow. To control the area where the fire will burn, one should build a pit or ring to contain the fire through the use of rocks or damp logs around the area of the fire. Do not use rocks that come from a water source as these are often porous and can explode in or next to fire which can lead to injury. Also, check the surrounding area to be sure there is not a risk for the fire to easily spread. One will want to check for dead trees and very dry areas in the area of effect of the fire (usually about 10 feet or 3 meters in a circular area from the site of the fire). (Mcnab p.119)
It is a good idea to gather the materials one will use to start and maintain a fire before making the fire itself. A fire will do little good if one cannot keep it burning for the amount of time needed for its intended use. The things one will want to find first are tinder, kindling, and fuel.
Tinder is easily combustible material with a sufficiently low combustion temperature such that it can be ignited from a spark or a match. Tinder is useful to get a sufficient temperature for ignition of more dense material which will do most of the work.
Kindling is generally more solid than tinder, but still with a sufficiently low combustion temperature to be ignited easily by lower temperatures, allowing for larger fuel to be added, which might require a very high combustion temperature. Kindling almost always consists of small pieces of dry wood, though it generally just needs to be something that can be ignited by tinder but will stay burning long enough to get the larger fuel ignited.
Fuel is the material that will ultimately be used to keep the fire going and do most of the work of the fire. In some cases, tinder and kindling is unnecessary, since the fuel can have a sufficiently low ignition temperature such that the fuel can be ignited by a simple flame or even a spark.
Just keep in mind that a fire should have materials added in a manner that will not choke it out. Not too much, but not too little. Remember that fire needs to 'breathe' oxygen, so if too much fuel is added without the fire being hot enough, the fire may get choked out.
Good tinder comes from dry materials with a very low ignition point. Some excellent tinder examples are:
Prepared Cotton Balls are cotton balls that have been soaked in petroleum jelly and allowed to dry. This action increases the amount of time the cotton will burn and decreases the ignition point for the material thus making it good tinder. Prepared Cotton Balls can be transported easily as they are small and can be pulled apart into smaller stringy fibers that will catch a spark easily.
Char cloth is a material made from natural plant fibers (such as cotton, jute or hemp) which has been converted through pyrolysis to remove the non-combustible materials leaving something very similar to a charcoal cloth, allowing for a very low combustion temperature. Char cloth is easy to create by heating the aforementioned material (plant fibers) in an oxygen free environment. There are many tutorials on creating Char cloth, on many different websites and in many different books. The Wikipedia article on Char cloth contains links to a few tutorials you may find useful.
For a more complete list of different fire making materials, please check the United States Survival Manual page 63. (One may even want to download a copy)
There are many different ways to put together the fuel one has collected for different types of fire and the practice is considered an art form by some.
One of the most commonly used and easily put together fire structures is the TeePee Fire. To start, lay down a layer of sticks or twigs as a bottom and four tougher and longer sticks that meet in a center point to form a Teepee shape. Once the structures posts are made, more sticks of a similar length can be added around to further strengthen the teepee structure. Note that one side is left open intentionally so that the tinder can be placed in the center and then spread to the rest of the structure.

In this type of fire, the larger sticks are laid in a star like pattern and can be maintained fairly easily. To kindle the fire, just push the sticks on the ground closer to the fire. To extinguish the fire, just pull the sticks away from the central point. The tinder bundle and smaller twigs go into the “heart” or center of the fire structure.(Survival Outdoor Skills.com)
Built correctly, a pyramid fire can and will burn unattended for a long time. It takes a little more work than the first two options and a bit more wood. As one can see from the picture, a pyramid is going to take up some space. Remember to give enough space between the logs so the fire can breathe. One should keep in mind that unlike other fires, the pyramid fire is burned from the top down, not the bottom up. In this way, a clean and long lasting burn effect is created.
The last fire options I will address are the underground or dug in fires. These fire structures are unique because they force air into the fire due to their construction. There is also an added benefit of stealth as the effects of a fire and the fire itself are well hidden with the dug in methods.
The Dakota Fire Hole is a simple hole in the ground with sticks placed across it to act as a grill. A separate hole is dug from the side and creates an underground vent that connects to the original hole.
For more information and a better understanding of this technique, check out this tutorial and review: Dakota Fire Hole
Then, there is the dug in fire in which the same principles apply, only, the hole in the ground is not as deep and longer. Also, the hole is not covered by anything on the surface. Sometimes known as a T fire or Keyhole fire, but can be in the shape of a cross as well. There are some examples of these structures: HERE.
Again, with any fire, the idea is to let the fire breathe and have enough material to keep it going. These are not the only fire structures, but should be useful for the purpose of survival.
Now, the materials are gathered, the structure is built, the surrounding area is clear; it’s time to light the fire. This begs the question: How to start the fire?
There are many different options when one is prepared for fire craft. A match can be a simple and easy way to start a fire. The same holds true for a lighter. However, there are methods that do not require a match at all. The earliest people to make fire used sticks rubbed together at high speed to cause friction, thus creating the heat for the ignition reaction. A tiny ember is all that is needed to start a large fire. Note that an ember usually needs a little coaxing through the addition of oxygen (blow air on it). Here is a list of different types of igniters:
Let’s take a look at each one individually and find out how to make and use them.
Fire Hand Drill: This technique requires a lot of time, patience, and pain tolerance. One also has to prepare the drill plank beforehand to accept the drill (or Spindle). The way to do this is to take the spindle and create a “burnt in” indention in the wood near the end of the drill plank by moving the spindle back and forth as if one was trying to make a fire. It will NOT make a fire at this point because there is no place for the ash to go, but this step is necessary for creating the amount of friction and stick lubrication needed for the fire later after the next step. Now, take a sharp tool and carve out an indention near the side of the plank were the burnt in indention was made with the spindle. Make sure that there is a cut out section that the ash can escape onto the tinder. If one does not make a notch, then one is wasting his/her time. Here is an example:Fire Drill NotchThe drill itself needs to be a strong stick. One starts by positioning the stick on the plank where the burnt in notch is. Then, with downward pressure, one pushes the drill stick back and forth between the hands as if one were rubbing his/her hands together starting from the top of the stick and working the way down. For a good example of this technique, see this video: Fire Hand Drill Technique. This is not for those with a low patience or pain tolerance, but it is an option.
Fire Bow Drill: A little more difficult to put together than the hand drill but it works on the same principle with the benefit of saving one’s hands from some the inevitable blisters received in the above method. For this drill, one needs a little bit of preparation on the fire drill plank, the bow, and the handhold. The drill itself works by being pulled back and forth while receiving downward pressure from the handhold.
The entire setup does not have to be very large and can be an easy to carry addition to a survival kit. The idea is to draw the drill spindle back and forth using the bow string wrapped around the spindle. The spindle is held in place by the hand hold and the drill plank. This method is shown well in this video: Fire Bow Drill Tutorial.
If you are planning on making a bow and arrow, this method would be an excellent choice to use.
Fire Plow: Perhaps one of the most well known ways to create fire is the Fire Plow method. This method was the same used in the movie Castaway staring Tom Hanks and is a real method for making fire. In this method, two pieces of wood and a bit of tinder are used. The whole setup looks something like this:

The fire plow is used by rubbing the stick back and forth on the plank in the middle indention to create ash that is transferred to the tinder. In this case, our tinder is a piece of Char Cloth.
Fire Piston: (Wikipedia Fire Piston)To see an example of a fire piston in action, watch this: Fire Piston in action. Les Stroud, Survivorman, used a fire piston on his television show to great effect in one episode.
Magnifying Glass: This method of starting a fire is fairly simple, but is dependant on the sun being out. This means that if the sky is too cloudy or it is night time, this will not work. To use this method, one needs some kind of magnifying glass, the sun, and a tinder-bundle. The objective is to redirect the sun’s rays onto the tinder-bundle in one area to bring it to the ignition point. This should create a small ember in time.
Reflector: This is the same idea as the magnifying glass in how it works, but instead of magnifying the rays, they are reflected off of some object. An easy way to do this is with a polished aluminum can bottom. There is a great video example of this technique in action: How to make a fire with a soda can and chocolate. This technique assumes the same advantages of the magnifying glass with the added benefit of a mirror; however, it also carries the same disadvantages. NOTE, if one chooses to use the technique in the video, one should not consume the same chocolate used to clean the can bottom as it will be a health hazard, aluminum particles do not do well in the stomach.
Flint Stick: A flint stick is just what it says it is, a stick of flint. Flint is a type of rock that when steel or an equivalent medium is scraped against it, a spark is created. Considering one has the right tinder, one little spark is all that is needed. Usually, a flint stick is in the shape of a rod and a knife is used to scrape down the side to create the ignition reaction. One of the coolest things about flint is that it can be found among different types of rocks. Just hit two rocks together and look for sparks off of either rock.
Magnesium Fire-strarter: A magnesium fire starter takes the flint stick idea and adds a little bit of help with a block of magnesium attached to the flint rod. The idea is that one scrapes magnesium shavings off of the small block into a pile next to or on top of the chosen tinder. Then, one uses something to scrape the flint rod (usually a knife) to make the spark..(Wikipedia Magnesium) To get a better idea of what a magnesium firestarter looks like, click Here.
Lighters: This one should be a bit of a no-brainer, but it really is not. Lighters can be purchased at just about any convenience store or large shopping center. There are many types of lighters and there are many different ideas on which are better to have for survival. Keep this fact in mind, lighters run on fuel and will eventually run out of fuel. Thedisposable lighters have a flint inside that will still spark long after the lighter is dead and that spark may be all one needs to start a fire. Some people swear by the Zippo, but the lighter uses a wick much like an old oil lamp. Get the wick wet with water (think rain) and one may have a hard time getting it to light again without replacing the wick. Wicks also eventually burn out. Refillable high-power butane lighters have the advantage of being wind proof because the flame they produce burns like a mini-torch. However, they use up their fuel more quickly than regular lighters. It really depends on the preference of the user and what he/she likes and/or is willing to put with. (For a good perspective on the advantages and disadvantages of the Zippo and other lighter as well as some great survival tips, check: Survival Outdoor Skkils.com (formally The Ranger Digest.com) and click on Zips and Sprark-lites in the left hand scroll bar menu)
Matches: A match is just a small stick with an end that is coated in a flammable material. Most matches have to be “struck” or drug across a rough surface called a striker (provided on the side of a matchbox) to ignite. There are different types of matches including book matches, box matches, and waterproof matches.
Book matches are the kind one finds in what is referred to as a “match book.” The base or “stick” of the match is made of cardboard and the top “business end” is coated in flammable material that when struck on the match book’s striker, will usually ignite. These matches are easy to carry, but are often ineffective, flimsy, and generally more dangerous to the user than a help. This is not to say that they cannot be effective. Their small size make them desirable for mini-survival kits.
A match box is just what is says, a box full of matches. The matches themselves are made of wood with flammable match “head” and the box of a hard cardboard. There are two parts to the match box; the outer sheath which has the striking surface and the inner tray which holds the matches. Usually, the matches are packed in the tray all facing one direction and the opposite end can be used to store used matches.
The final type of match is the waterproof match. Please note that the name waterproof is misleading as these types of matches are really more water resistant, not water proof. Water can soak into the match stick or the match head over time and make them ineffective. That stated, it is highly recommended that a waterproof match container be used. Acquiring one can be as simple as getting a 35 millimeter film canister and clipping the bottom end of the match “stem” to fit them in the can. There are ways to waterproof one’s own matches through soaking them in Thompson’s Water Seal or Candle wax, but one can also buy them from outdoor outfitters and some larger store chains (Wal-mart, Target, Cabela’s). If all else fails, there are always online resources to buy from.
*Note: There is a type of match known as the LIFEBOAT Match and is said to be like a small torch, waterproof, windproof, and really bright. While very useful, they are hard to find, but if one does find them, they are highly recommended by many a survival expert.
Batteries: Yes, even a battery can be used to start a fire. Most often, this is accomplished through the use of wires connected to the batteries ends or an equivalent conductor. There is a fairly simple technique involving a 9-volt battery and a piece of steel wool. One just touches the 9-volt to the steel wool and sparks are created, a simple tinder solution and easy to carry. To see an example of this watch here: Fire with Steel Wool and 9 volt Battery.If one has a car battery and “jumper cables,” one can touch the opposite ends of the cables (the ones not connected directly to the battery terminals) together to make sparks and thus fire, but the car battery will be more dangerous to work with than it’s smaller cousins and is not recommended. Remember, the idea is to make a spark, not electrocute, shock, or burn one’s self.
So now, the area has been cleared, the tinder, kindling, and fuel has been gathered, the fire architecture has been put together, and the igniter is ready to go. One just needs to ignite the tinder and get the fire started. The tricky part is to get the ember to ignite the tinder bundle. This is done by first creating the heat through whatever method is chosen and introducing the ember created to the tinder. Often, one will have to blow on the tinder bundle (think a human bellows) and it is recommended that one do so with the wind at the back. The smoke will blow away from the face of the individual instead of into his/her face.

It should not take too long for the flames to start and then the tinder bundle can be added to the fire structure and slowly fueled. One does not want to lose the fire quickly by adding too much fuel too fast, this will kill a fire. Likewise, too little or no kindling can lead to loss of a good fire. Finding the right mixture is something that comes with practice.
So, there it is, How to Make FIRE!
DISCLAIMER: The techniques and practices provided here are for entertainment purposes only and the author takes no responsibility for the actions of the reader relating to the consequences of how the reader chooses to use the above information. Fire is a dangerous force of nature and can be deadly when used or handled carelessly. Furthermore, the use of fire as a weapon is NOT recommended as fire can be unpredictable. If one chooses to practice or try anything in the aforementioned article, PLEASE do so with extreme caution and take the proper measures to ensure the safety of all individuals. Above all, use the organ located above the neck and in the cranium responsible for rational thought when dealing with any potentially dangerous material. Again, the author takes no responsibility for the reader’s actions and no legal action can be taken against the author for use or misuse of the provided information. Remember, fire=bad when misused. Thanks for reading.
Works Cited:
McNab, Dr. Chris How to Survive Anything, Anywhere: A Handbook of Survival Skills for Every Scenario and Environment. McGraw Hill Companies, 2005
Akkermans, Anthonio Bushcraft Skills and How to Survive in the Wild: A Step-by-Step Practical Guide. Amnes Publishing Ltd 2007, Southwater Division.
www.ar15.com/content/manuals/FM21-76_SurvivalManual.pdf
www.brasscompass.com/zippolighter.jpg
en.wikipedia.org/wiki/Fire_piston
en.wikipedia.org/wiki/Magnesium
www.getlit.com/nhtml/images-lighters/lighters_25.gif
www.hollowtop.com/spt_html/fireplow.htm
science.howstuffworks.com/fire.htm
www.instructables.com/id/How-to-make-a-torch-for-less-than-a-dollar-%3a-/
www.keaneshaped.co.uk/disco/images/promos/haf/matchboxinside.jpg
studio.netmar.com/zippo/images08/anatomy.jpg
www.survival-gear.com/survival-gear-images/doansmagnesiumfirestarter.jpg
www.survivalschool.com/articles/Fire_Making/notch_construction.htm
www.survivaltopics.com/survival/the-dakota-fire-hole/
www.survivaloutdoorskills.com/
www.wonderhowto.com/how-to/video/how-to-make-fire-using-soda-and-chocolate-1849/
www.wonderhowto.com/how-to/video/how-to-make-fire-with-steel-wool-and-a-battery-196097/
www.youtube.com/watch?v=CF9GiK_T4PA
www.youtube.com/watch?v=NL4BbyAypX4&feature=related
www.youtube.com/watch?v=PxSvpd_RRXk
So, what can one do with a fire? “Army Ranger Rick” has this to say on the subject:
Also, fire can be used to make improvised weaponry, such as a spear, stronger by charring the sharp end in the fire. Fire can be transferred to a torch for a light and heat source that is portable. Fire can be a precious ally in the struggle for survival and therefore every serious survivor should know how to make one.
Three Components of Fire
There are things that are needed for any fire:
In order to start a fire, one needs a good fuel source with lots of potential energy which will be released through burning, ample oxygen for the fire to consume, and an adequate amount of heat to get the fuel up to its ignition temperature. If these three conditions are met, then fire can exist. For a more complex and in-depth look at how the elements come together to make fire, please check the the "How Fire Works" article from How Stuff Works.
Where to build a fire?
Generally, one will want to build a fire on dry ground with ample airflow. To control the area where the fire will burn, one should build a pit or ring to contain the fire through the use of rocks or damp logs around the area of the fire. Do not use rocks that come from a water source as these are often porous and can explode in or next to fire which can lead to injury. Also, check the surrounding area to be sure there is not a risk for the fire to easily spread. One will want to check for dead trees and very dry areas in the area of effect of the fire (usually about 10 feet or 3 meters in a circular area from the site of the fire). (Mcnab p.119)
Fire Making Materials
It is a good idea to gather the materials one will use to start and maintain a fire before making the fire itself. A fire will do little good if one cannot keep it burning for the amount of time needed for its intended use. The things one will want to find first are tinder, kindling, and fuel.
Tinder is easily combustible material with a sufficiently low combustion temperature such that it can be ignited from a spark or a match. Tinder is useful to get a sufficient temperature for ignition of more dense material which will do most of the work.
Kindling is generally more solid than tinder, but still with a sufficiently low combustion temperature to be ignited easily by lower temperatures, allowing for larger fuel to be added, which might require a very high combustion temperature. Kindling almost always consists of small pieces of dry wood, though it generally just needs to be something that can be ignited by tinder but will stay burning long enough to get the larger fuel ignited.
Fuel is the material that will ultimately be used to keep the fire going and do most of the work of the fire. In some cases, tinder and kindling is unnecessary, since the fuel can have a sufficiently low ignition temperature such that the fuel can be ignited by a simple flame or even a spark.
Just keep in mind that a fire should have materials added in a manner that will not choke it out. Not too much, but not too little. Remember that fire needs to 'breathe' oxygen, so if too much fuel is added without the fire being hot enough, the fire may get choked out.
What makes good tinder?
Good tinder comes from dry materials with a very low ignition point. Some excellent tinder examples are:
Prepared Cotton Balls are cotton balls that have been soaked in petroleum jelly and allowed to dry. This action increases the amount of time the cotton will burn and decreases the ignition point for the material thus making it good tinder. Prepared Cotton Balls can be transported easily as they are small and can be pulled apart into smaller stringy fibers that will catch a spark easily.
Char cloth is a material made from natural plant fibers (such as cotton, jute or hemp) which has been converted through pyrolysis to remove the non-combustible materials leaving something very similar to a charcoal cloth, allowing for a very low combustion temperature. Char cloth is easy to create by heating the aforementioned material (plant fibers) in an oxygen free environment. There are many tutorials on creating Char cloth, on many different websites and in many different books. The Wikipedia article on Char cloth contains links to a few tutorials you may find useful.
For a more complete list of different fire making materials, please check the United States Survival Manual page 63. (One may even want to download a copy)
Firemaking Strategies & Structures
There are many different ways to put together the fuel one has collected for different types of fire and the practice is considered an art form by some.
Different types of fire will produce different burn characteristics. Remember that the more open the fire’s structure, the more air is introduced, and the more intensely the fire will burn. (McNab, pg. 118)
Teepee Fire
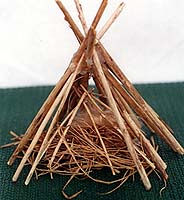
One of the most commonly used and easily put together fire structures is the TeePee Fire. To start, lay down a layer of sticks or twigs as a bottom and four tougher and longer sticks that meet in a center point to form a Teepee shape. Once the structures posts are made, more sticks of a similar length can be added around to further strengthen the teepee structure. Note that one side is left open intentionally so that the tinder can be placed in the center and then spread to the rest of the structure.
Star Fire
In this type of fire, the larger sticks are laid in a star like pattern and can be maintained fairly easily. To kindle the fire, just push the sticks on the ground closer to the fire. To extinguish the fire, just pull the sticks away from the central point. The tinder bundle and smaller twigs go into the “heart” or center of the fire structure.(Survival Outdoor Skills.com)
Pyramid Fire
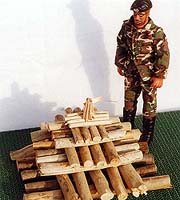
Built correctly, a pyramid fire can and will burn unattended for a long time. It takes a little more work than the first two options and a bit more wood. As one can see from the picture, a pyramid is going to take up some space. Remember to give enough space between the logs so the fire can breathe. One should keep in mind that unlike other fires, the pyramid fire is burned from the top down, not the bottom up. In this way, a clean and long lasting burn effect is created.
Underground Fire/Fire Hole
The last fire options I will address are the underground or dug in fires. These fire structures are unique because they force air into the fire due to their construction. There is also an added benefit of stealth as the effects of a fire and the fire itself are well hidden with the dug in methods.
The Dakota Fire Hole is a simple hole in the ground with sticks placed across it to act as a grill. A separate hole is dug from the side and creates an underground vent that connects to the original hole.
For more information and a better understanding of this technique, check out this tutorial and review: Dakota Fire Hole
Then, there is the dug in fire in which the same principles apply, only, the hole in the ground is not as deep and longer. Also, the hole is not covered by anything on the surface. Sometimes known as a T fire or Keyhole fire, but can be in the shape of a cross as well. There are some examples of these structures: HERE.
Again, with any fire, the idea is to let the fire breathe and have enough material to keep it going. These are not the only fire structures, but should be useful for the purpose of survival.
Ignition Devices or Producing the Spark
Now, the materials are gathered, the structure is built, the surrounding area is clear; it’s time to light the fire. This begs the question: How to start the fire?
There are many different options when one is prepared for fire craft. A match can be a simple and easy way to start a fire. The same holds true for a lighter. However, there are methods that do not require a match at all. The earliest people to make fire used sticks rubbed together at high speed to cause friction, thus creating the heat for the ignition reaction. A tiny ember is all that is needed to start a large fire. Note that an ember usually needs a little coaxing through the addition of oxygen (blow air on it). Here is a list of different types of igniters:
Let’s take a look at each one individually and find out how to make and use them.
Fire Hand Drill: This technique requires a lot of time, patience, and pain tolerance. One also has to prepare the drill plank beforehand to accept the drill (or Spindle). The way to do this is to take the spindle and create a “burnt in” indention in the wood near the end of the drill plank by moving the spindle back and forth as if one was trying to make a fire. It will NOT make a fire at this point because there is no place for the ash to go, but this step is necessary for creating the amount of friction and stick lubrication needed for the fire later after the next step. Now, take a sharp tool and carve out an indention near the side of the plank were the burnt in indention was made with the spindle. Make sure that there is a cut out section that the ash can escape onto the tinder. If one does not make a notch, then one is wasting his/her time. Here is an example:Fire Drill NotchThe drill itself needs to be a strong stick. One starts by positioning the stick on the plank where the burnt in notch is. Then, with downward pressure, one pushes the drill stick back and forth between the hands as if one were rubbing his/her hands together starting from the top of the stick and working the way down. For a good example of this technique, see this video: Fire Hand Drill Technique. This is not for those with a low patience or pain tolerance, but it is an option.
Fire Bow Drill: A little more difficult to put together than the hand drill but it works on the same principle with the benefit of saving one’s hands from some the inevitable blisters received in the above method. For this drill, one needs a little bit of preparation on the fire drill plank, the bow, and the handhold.
The drill itself works by being pulled back and forth while receiving downward pressure from the handhold.The entire setup does not have to be very large and can be an easy to carry addition to a survival kit. The idea is to draw the drill spindle back and forth using the bow string wrapped around the spindle. The spindle is held in place by the hand hold and the drill plank. This method is shown well in this video: Fire Bow Drill Tutorial.
If you are planning on making a bow and arrow, this method would be an excellent choice to use.
Fire Plow: Perhaps one of the most well known ways to create fire is the Fire Plow method. This method was the same used in the movie Castaway staring Tom Hanks and is a real method for making fire. In this method, two pieces of wood and a bit of tinder are used. The whole setup looks something like this:
The fire plow is used by rubbing the stick back and forth on the plank in the middle indention to create ash that is transferred to the tinder. In this case, our tinder is a piece of Char Cloth.
Fire Piston:
A fire piston, sometimes called a fire syringe, is a device of ancient origin which is used to kindle fire. It uses the principle of the heating of a gas (in this case air) by its rapid (adiabatic) compression to ignite a piece of tinder, which is then used to set light to kindling.
Magnifying Glass: This method of starting a fire is fairly simple, but is dependant on the sun being out. This means that if the sky is too cloudy or it is night time, this will not work. To use this method, one needs some kind of magnifying glass, the sun, and a tinder-bundle. The objective is to redirect the sun’s rays onto the tinder-bundle in one area to bring it to the ignition point. This should create a small ember in time.
Reflector: This is the same idea as the magnifying glass in how it works, but instead of magnifying the rays, they are reflected off of some object. An easy way to do this is with a polished aluminum can bottom. There is a great video example of this technique in action: How to make a fire with a soda can and chocolate. This technique assumes the same advantages of the magnifying glass with the added benefit of a mirror; however, it also carries the same disadvantages. NOTE, if one chooses to use the technique in the video, one should not consume the same chocolate used to clean the can bottom as it will be a health hazard, aluminum particles do not do well in the stomach.
Flint Stick: A flint stick is just what it says it is, a stick of flint. Flint is a type of rock that when steel or an equivalent medium is scraped against it, a spark is created. Considering one has the right tinder, one little spark is all that is needed. Usually, a flint stick is in the shape of a rod and a knife is used to scrape down the side to create the ignition reaction. One of the coolest things about flint is that it can be found among different types of rocks. Just hit two rocks together and look for sparks off of either rock.
Magnesium Fire-strarter: A magnesium fire starter takes the flint stick idea and adds a little bit of help with a block of magnesium attached to the flint rod. The idea is that one scrapes magnesium shavings off of the small block into a pile next to or on top of the chosen tinder. Then, one uses something to scrape the flint rod (usually a knife) to make the spark.
Magnesium is a highly flammable metal, but while it is easy to ignite when powdered or shaved into thin strips, it is difficult to ignite in mass or bulk.
Lighters: This one should be a bit of a no-brainer, but it really is not. Lighters can be purchased at just about any convenience store or large shopping center. There are many types of lighters and there are many different ideas on which are better to have for survival. Keep this fact in mind, lighters run on fuel and will eventually run out of fuel. Thedisposable lighters have a flint inside that will still spark long after the lighter is dead and that spark may be all one needs to start a fire. Some people swear by the Zippo, but the lighter uses a wick much like an old oil lamp. Get the wick wet with water (think rain) and one may have a hard time getting it to light again without replacing the wick. Wicks also eventually burn out. Refillable high-power butane lighters have the advantage of being wind proof because the flame they produce burns like a mini-torch. However, they use up their fuel more quickly than regular lighters. It really depends on the preference of the user and what he/she likes and/or is willing to put with. (For a good perspective on the advantages and disadvantages of the Zippo and other lighter as well as some great survival tips, check: Survival Outdoor Skkils.com (formally The Ranger Digest.com) and click on Zips and Sprark-lites in the left hand scroll bar menu)
Matches: A match is just a small stick with an end that is coated in a flammable material. Most matches have to be “struck” or drug across a rough surface called a striker (provided on the side of a matchbox) to ignite. There are different types of matches including book matches, box matches, and waterproof matches.
Book matches are the kind one finds in what is referred to as a “match book.” The base or “stick” of the match is made of cardboard and the top “business end” is coated in flammable material that when struck on the match book’s striker, will usually ignite. These matches are easy to carry, but are often ineffective, flimsy, and generally more dangerous to the user than a help. This is not to say that they cannot be effective. Their small size make them desirable for mini-survival kits.
A match box is just what is says, a box full of matches. The matches themselves are made of wood with flammable match “head” and the box of a hard cardboard. There are two parts to the match box; the outer sheath which has the striking surface and the inner tray which holds the matches. Usually, the matches are packed in the tray all facing one direction and the opposite end can be used to store used matches.
The final type of match is the waterproof match. Please note that the name waterproof is misleading as these types of matches are really more water resistant, not water proof. Water can soak into the match stick or the match head over time and make them ineffective. That stated, it is highly recommended that a waterproof match container be used. Acquiring one can be as simple as getting a 35 millimeter film canister and clipping the bottom end of the match “stem” to fit them in the can. There are ways to waterproof one’s own matches through soaking them in Thompson’s Water Seal or Candle wax, but one can also buy them from outdoor outfitters and some larger store chains (Wal-mart, Target, Cabela’s). If all else fails, there are always online resources to buy from.
*Note: There is a type of match known as the LIFEBOAT Match and is said to be like a small torch, waterproof, windproof, and really bright. While very useful, they are hard to find, but if one does find them, they are highly recommended by many a survival expert.
Batteries: Yes, even a battery can be used to start a fire. Most often, this is accomplished through the use of wires connected to the batteries ends or an equivalent conductor. There is a fairly simple technique involving a 9-volt battery and a piece of steel wool. One just touches the 9-volt to the steel wool and sparks are created, a simple tinder solution and easy to carry. To see an example of this watch here: Fire with Steel Wool and 9 volt Battery.If one has a car battery and “jumper cables,” one can touch the opposite ends of the cables (the ones not connected directly to the battery terminals) together to make sparks and thus fire, but the car battery will be more dangerous to work with than it’s smaller cousins and is not recommended. Remember, the idea is to make a spark, not electrocute, shock, or burn one’s self.
Putting It All Together
So now, the area has been cleared, the tinder, kindling, and fuel has been gathered, the fire architecture has been put together, and the igniter is ready to go. One just needs to ignite the tinder and get the fire started. The tricky part is to get the ember to ignite the tinder bundle. This is done by first creating the heat through whatever method is chosen and introducing the ember created to the tinder. Often, one will have to blow on the tinder bundle (think a human bellows) and it is recommended that one do so with the wind at the back. The smoke will blow away from the face of the individual instead of into his/her face.
It should not take too long for the flames to start and then the tinder bundle can be added to the fire structure and slowly fueled. One does not want to lose the fire quickly by adding too much fuel too fast, this will kill a fire. Likewise, too little or no kindling can lead to loss of a good fire. Finding the right mixture is something that comes with practice.
So, there it is, How to Make FIRE!
DISCLAIMER: The techniques and practices provided here are for entertainment purposes only and the author takes no responsibility for the actions of the reader relating to the consequences of how the reader chooses to use the above information. Fire is a dangerous force of nature and can be deadly when used or handled carelessly. Furthermore, the use of fire as a weapon is NOT recommended as fire can be unpredictable. If one chooses to practice or try anything in the aforementioned article, PLEASE do so with extreme caution and take the proper measures to ensure the safety of all individuals. Above all, use the organ located above the neck and in the cranium responsible for rational thought when dealing with any potentially dangerous material. Again, the author takes no responsibility for the reader’s actions and no legal action can be taken against the author for use or misuse of the provided information. Remember, fire=bad when misused. Thanks for reading.
Works Cited:
McNab, Dr. Chris How to Survive Anything, Anywhere: A Handbook of Survival Skills for Every Scenario and Environment. McGraw Hill Companies, 2005
Akkermans, Anthonio Bushcraft Skills and How to Survive in the Wild: A Step-by-Step Practical Guide. Amnes Publishing Ltd 2007, Southwater Division.
www.ar15.com/content/manuals/FM21-76_SurvivalManual.pdf
www.brasscompass.com/zippolighter.jpg
en.wikipedia.org/wiki/Fire_piston
en.wikipedia.org/wiki/Magnesium
www.getlit.com/nhtml/images-lighters/lighters_25.gif
www.hollowtop.com/spt_html/fireplow.htm
science.howstuffworks.com/fire.htm
www.instructables.com/id/How-to-make-a-torch-for-less-than-a-dollar-%3a-/
www.keaneshaped.co.uk/disco/images/promos/haf/matchboxinside.jpg
studio.netmar.com/zippo/images08/anatomy.jpg
www.survival-gear.com/survival-gear-images/doansmagnesiumfirestarter.jpg
www.survivalschool.com/articles/Fire_Making/notch_construction.htm
www.survivaltopics.com/survival/the-dakota-fire-hole/
www.survivaloutdoorskills.com/
www.wonderhowto.com/how-to/video/how-to-make-fire-using-soda-and-chocolate-1849/
www.wonderhowto.com/how-to/video/how-to-make-fire-with-steel-wool-and-a-battery-196097/
www.youtube.com/watch?v=CF9GiK_T4PA
www.youtube.com/watch?v=NL4BbyAypX4&feature=related
www.youtube.com/watch?v=PxSvpd_RRXk